How to Install a Garbage Disposer
garbage disposal
garbage disposal
Learn all about removing the old unit, installing the new one, and hooking up the electrical and plumbing
Relatively unused and even somewhat unknown in the rest of the world, garbage disposers are a nearly universal feature of the American kitchen. Installing one is a fairly straightforward effort, but not without its difficulties. In this tutorial, we'll be covering the basics of both common mounting systems, and offering some helpful tips to ensure a successful installation.
Always be sure to thoroughly read the installation instructions for your particular unit before getting to work: while most disposers are installed in the same basic way, your model may have unique and important steps not covered in an overview like this.
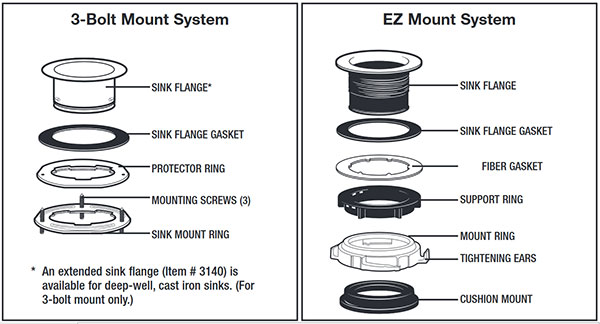
There are two popular mount systems used for garbage disposers: the standard 3-bolt mount (if you've had a disposer installed for some time, it's probably mounted this way) and a newer system called the "EZ Mount" by Waste King (Insinkerator has a similar system called "Quick Lock"). Each accomplish the same task with little difference, aside from their installation. As the name implies, the EZ Mount mechanism is intended to be easier to deal with when installing or repairing a unit.
Chapter 1: You'll want to have the following at the ready:
• Self-Service Wrench (aka Allen Wrench, Hex Key)
• Water Pump Pliers (aka Channellock Pliers)
• Screwdrivers - Flat and Phillips-Head
• Plumber's Putty or Silicone Sealant
• Hacksaw or Pipe Cutter
• Wire Strippers
• Wire Nuts
• Voltage Detector
• Bucket
• Strain Relief Bushing (for power cable)
• 1-1/2" Slip Joint Nuts & Washers (for connecting disposer to drain plumbing)
It's a good idea to take the dimensions of the new disposer and measure under the sink before you begin - you'll want to know if the existing drain pipes can be reused or modified to accommodate the new setup, or if you'll have to replace them. You also want to see if the tools you have will work in what could become an even more confined space - will you need something with a shorter handle, smaller jaws, or...?
Chapter 2: Removing an Existing Disposer
Before doing anything, make sure the power to the disposer is OFF. Plug-in models can simply be unplugged, but a hardwired unit must have the appropriate circuit breaker turned off. Confirm the electricity is off with a voltage detector.
Begin by disconnecting the drain pipe connected to the disposal. This should be a simple matter of unscrewing the nuts on the slip joints at either end (tongue and groove pliers may come in handy). Place a bucket underneath to catch any residual water. If a dishwasher is connected to the disposer, disconnect that hose as well.
Pro Tip: With the sink trap open and accessible, there's no better time to give the drain line a quick augering to clear out any buildup that's present - one less thing to worry about later!
Did your old disposer come with a "self service wrench" (aka hex key/allen wrench)? Do you still have it? It's a handy tool not only for turning the motor when it's stuck, but also for mounting/unmounting the disposer. Whatever the mounting system, you'll see a large metal ring with a few curled ends or ears around it (some are curled down, some up) - this is the mount ring. To get the necessary leverage to free the disposer from the mount, you can insert the self-service wrench - or a screwdriver - into one of these ears and turn clockwise. Another screwdriver in the ear opposite can provide more leverage for units that are really on there, or you can use a hammer to tap the screwdriver.
Pro Tip: It's helpful to have something under the disposer at this point, or someone holding it: older models can be quite heavy, and with a maximum of one hand available, it can be difficult to free it from the mount while preventing a free fall, which can damage other things under the sink, or cause injury. An empty bucket, a bottle jack, a stack of books - anything can help.
With 3-bolt units, the lower mount ring will come off the rest of the mounting hardware with the disposer; on EZ Mount units, only the disposer will come off - the unit is turned until the black tab (or "hopper projection") at the top of the unit is no longer secured in the smallest, leftmost end of the groove in the metal mount ring.
Note: When replacing an old disposer, we recommend replacing the old mounting hardware as well, even when the mounting systems are the same. While it is more work to remove the old flange and mount, doing so will avoid any potential compatibility issues or problems resulting from wear and tear. It also gives you the chance to put some fresh putty down, which can dry out over time and compromise the flange seal.
2.1 EZ Mount Hardware Removal
Once the disposer is off, the mount ring can be removed by first pulling out the rubber "cushion mount" found inside of it - you should be able to simply reach into the mount ring and grasp the rubber piece with your fingers. The mount ring will fall, giving you access to the rest of the assembly. Unscrew the plastic support ring and remove the fiber gasket to free up the flange, which you can now push up and out through the sink. A gasket may need to be gently pried off the sink, or there may be old putty. Clean the inside and underside of the sink, and you're ready for a new disposer!
2.2 3-Bolt Mount Hardware Removal
Loosen the screws on the upper mount ring (flange mount) enough to push the ring up a bit - you'll see a small "snap ring" around the bottom of the sink flange (this ring keeps the mount ring from sliding off the flange). Use a flat-blade screwdriver to pry the ring off, and remove the mount ring and upper "protector" ring against the sink. The flange (and associated gasket, if applicable) can now be popped out of the drain hole. Clean the area for the new unit.
Chapter 3: Electrical Connections
Always check for power with a voltage detector before dealing with electrical components! If your new disposer doesn't come out of the box with an attached cord and plug, you'll need to attach one, or hardwire the unit directly into the electrical system. Chances are you can reuse the existing power cord - check the manufacturer's specifications to be certain.
3.1 Power Cord
• To remove the cord from the old disposer, use a screwdriver to remove the plate covering the electrical connections at the bottom of the unit. Disconnect the wire nuts and pull the cord through the cover plate hole.
• To connect a power cord to the new unit, remove the electrical cover plate on the bottom of the disposer and join the colored wires found inside with their counterparts in the cord, using wire nuts. The green ground wire is looped under the green screw on the unit. This can be done at any point prior to installation.
Pro Tip: The area under the sink is often reserved for cleaning products and other things, making it all too easy for the disposer power cord to be accidentally yanked. A strain relief bushing/clamp will keep the power cord safe and secure where it exits the disposer. These inexpensive fittings are easily found at any home improvement store, if one is not included with your unit.
3.2 Hardwired
• If the new disposer is to be hardwired, you can simply connect the existing cable coming out of the junction box to the wires found inside the disposer. Because the cable is already secured and connected in the box, this step is best accomplished just before mounting the disposer.
• If a cable has not yet been run to the junction box, you can make the connections within the new disposer any time beforehand, joining the cable to the wires in the box just before or just after mounting the disposer.
Garbage disposers need to have a dedicated 120 volt, 20 amp circuit. Do NOT use a shared outlet or circuit. Consult with an electrician before installation if there's any question about the electrical setup in your kitchen.
Chapter 4: Installing the New Unit
Note: The disposer outlet must be above the drain line coming out of the wall. If it isn't, you'll need to either choose a smaller disposer, or modify the plumbing to accommodate the new setup.
If your sink has never had a disposer, you'll need to first replace the flange. Pliers can help loosen the slip joints on the tailpiece and trap, as well as the locknut holding the flange. Once the drain pipes and flange have been removed and the area is clean, you're ready to install the new disposer flange.
Your disposer may come with a thin rubber gasket to be used under the sink flange, instead of the traditional plumber's putty as outlined below. Both will create a good seal (though the gasket may result in small amounts of water collecting around the flange), and what's used is largely a matter of preference. Some even prefer silicone sealant, though it's more difficult to remove.
4.1 Replacing the Flange
• Roll a 1/2" diameter length of putty, long enough to wrap around the underside of the new flange (or an adequate amount of silicone, if you're so inclined). If you're a stickler, now's the time to decide on the proper placement of the flange - if there are any logos or text, where do you want them? Press the flange firmly into the drain hole of the sink.
• Because you're going to be attaching the mounting hardware to the flange, you need to have something weighting it down from inside the sink to keep it in place. Unless you have someone helping, the most convenient option is to place either the old or new disposer in there (a towel underneath will keep the sink safe from scratches).
Pro Tip: If you're going to be draining a dishwasher through the unit, now is the best time to remove the knockout plug inside the dishwasher inlet. Use a hammer to tap a screwdriver into the inlet until the plug is broken off; retrieve the small piece of plastic from inside the disposer. This is also the ideal time to make the connections for a hardwired unit with a pre-existing junction box.
With the flange in place and weighted down, it's time to move under the sink. The mounting assembly components are a bit different between the two mounting systems, but the process is largely the same.
4.2 3-Bolt Mount Installation
• With the 3-bolt mount, you'll want the fiber gasket first on the flange, followed by the protector or support ring, followed by the mount ring (the one with the bolts). Loosen the bolts as much as possible so that you can slide the mount ring up the flange. This makes it easier to attach the snap ring (a small ring that fits into a groove on the bottom of the flange) which is what holds the mount in place. Hold the ring around the flange as best you can with one hand, and use a screwdriver in the other to pry the ring apart just enough to get it over the flange and into the groove. With the snap ring in place, tighten the bolts evenly.
• Attach the rubber gasket and discharge elbow to the disposer using the plate and screws (or clamp) provided.
• On the mount ring, you'll notice 3 tabs extending out between the bolts; these will engage with grooves at the top of the disposer. Line the grooves up with the tabs, and turn the disposer until it's firmly locked in place. The self-service wrench and/or a screwdriver in the curled ears of the mount ring will provide the leverage to fully tighten the unit in place.
Pro Tip: For heavy disposers or awkward installations, try using your knee, a jack, or an upside-down bucket to help support the disposer while mounting.
Chapter 5: Plumbing Connections
Once the new unit is firmly mounted under the sink, it's time to hook up the plumbing, a process that's largely the same whatever mount is used. The specifics - where you start, how much you cut, and how it's all arranged - are unique to each installation.
• If you're replacing an old unit, there's a good chance the existing drain pipes can be used. As we mentioned at the beginning, it's nice to get everything figured out beforehand to save a rushed trip to the store. You'll find out immediately upon mounting if the existing pipes are sufficient.
• We'll assume that you have the drain line stub-out sticking out of the wall, to which a length of pipe is connected. That pipe joins up with the p-trap. Ideally, the drain connections will be made using 1-1/2" slip joint nuts and washers, which allow for easy removal. To assemble the slip joint, all you have to do is slide the nut onto the pipe (with threads facing the end of the pipe), followed by the tapered washer (you'll want the smaller, tapered end to face away from the nut). Hand-tighten, but wait until you're sure everything is lined up perfect before further tightening with pliers.
• Note: 3-Bolt Mount disposers can be rotated to meet up with plumbing pipes; EZ Mount disposers are rotated via the mount ring, not the disposer (turning the disposer can dismount it!)
• With a single bowl sink, all you should need to do is place the slip joint nut and washer on the disposer's discharge elbow to connect it directly to the trap. Should the elbow be too long for the trap, it can be cut to size.
5.1 Double Bowl Plumbing
• For double-bowl sinks, the best way to go about things is to use a continuous waste disposer kit consisting of a discharge tube, baffle tee, and tailpiece. Such kits direct both drains to a single trap. Depending on the location of the stub out, you'll need either an end outlet or center outlet kit.
• The bowl without the disposer will need a tailpiece. Remove the large nut under the sink that holds the basket strainer/flange in place on the drain. Place a washer (included with the kit) in the nut, stick the tailpiece through it, and connect the assembly back onto the drain.
• Pro Tip: If the nut on the drain is stuck and turns the entire assembly when you're trying to loosen it, stick the handles of your pliers into the drain from inside the sink: this will lock the drain in place, allowing you to remove the nut. Should the sink strainer turn during any of this, it should be reset with fresh putty or silicone to prevent future leaks.
• The tee connects to the above tailpiece, and is then joined to the trap. Depending on the height of the trap and the length of the disposer discharge, some cutting may be needed to get everything lined up.
• The discharge tube included in the disposer kit will be attached to the disposer using the plate, gasket and screws originally intended for the disposer discharge elbow. If your kit only includes a waste arm, it is possible - though not recommended - to connect this to the disposer discharge elbow using a slip joint. The consecutive 90° turns in such a setup can lead to improper drainage. Depending on the length of the waste arm, you may be able to cut off its elbow and use the remainder as a straight discharge tube.
• Once secured to the disposer, the discharge tube will be connected to the baffle tee using a slip joint nut and washer. If the tube is too long, use your preferred cutting tool to get it to size.
• The discharge tube running between the disposer and tee should be sloped at least 1/4" toward the tee to ensure proper drainage. It may be possible to move the tee down on the tailpiece, depending on the length of the latter.
• To help avoid blockages within the tee (a consequence of the baffle inside), some plumbers will connect the disposer discharge directly to the tee of an end-outlet continuous waste, rather than use the method laid out above. Because the baffle effectively halves the interior diameter of the tee, it's easy for waste from the disposer to clog it up. This is especially true when the waste must travel horizontally (down the arm) and then change direction to fall down the trap. Having the disposer discharge straight down into the tee allows for a direct line to the trap that's relatively friction-free. In this set-up, a waste arm runs between the other sink drain and the tee.
An alternative discharge method calls for a slip joint extension. Depending on the height of the drain line stub out coming out of the wall, it may be necessary to rotate the disposer's discharge elbow to a flat or horizontal position to maintain its position above the drain line. Should this be needed, a slip joint extension can be used to create a straight connection from the disposer to the tee opposite, maintaining the height of the disposer discharge above the house drain line without having to open up the wall.
Once everything looks like it's going to fit together, you can go ahead and fully tighten the slip joints with your pliers. If connecting a dishwasher to the disposer, secure the dishwasher's drain hose to the inlet on the disposer.
Test the installation by plugging the drain(s), filling the bowl(s) with water, and letting it all drain out at once - the large amount of water and pressure should expose any weak spots around the flange and along the plumbing (remind yourself to regularly check under the sink over the following weeks to ensure no leaks or other problems are evading detection). Plug the unit in, turn the breaker on, and dispose of some garbage!
Ready to purchase and install your new garbage disposal? We've got a great selection!
Zhejiang Rosun Kitchen & Bath Technology Co., Ltd. is a manufacture of quality garbage disposer and accessories since 1992 with a registered capital of USD 1.5 million. It’s located in Yuhuan, Zhejiang Province of China, covers areas of 75,347 sq. ft, owns 129,167 sq. ft of workshop with more than 200 experienced workers and staffs.
Rosun established Disposer laboratory with an independent R&D team, together with a complete production system from moulding, casting, precision machining, polishing and assemble workshop since it’s founded, Rosun has provided professional OEM & ODM services for numerous customers overseas and domestic.
#Rosun garbage disposal
#max garbage disposal


 Send Email
 winnie.wang@rosun.com